2021年08月13日
Editing Classic Skin
A friend asked me how to edit colors of classic skins. I answered that it would not pay off except trying to make a strange one intentionally, but is sounds interesting, so I confirmed it. There are three ways to change color of classic skins.
1.To pick up a favorite one out of variations of available skins.
2.To edit the color to favorite one.
3.To edit the skin texture directly.
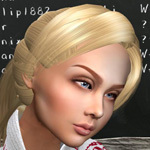
The below shows some of my skins which I got free. I have more than 300 skins in my inventory. Normally one skin comes with 10 to 20 variations, so it should be easy to find a favorite one without editing. The eyebrows are separate parts that can be changed.

The second way is to edit oneself. An editable skin is required. Most of skins are No Modify, so need to use free gifts or the one provided for newbies by Linden. Do not forget to make a copy and save it before editing, not to lose the original one. With the skin worn condition, touch “Edit” of the skin in your inventory to open the “Editing Skin” window (left). Since the skin is treated as Tattoo, the “Skin Color” table will not work with it. Then click the “Head Tattoo” on the left to open the “Pick Texture” window (right).

Click the “Transparent” in the opened window. The button turns dark but will return by pushing “Default”, “Blank”, or “None”. Some strange face may come out, but this should be edited in the left window.

The editing items are under “Skin Color”, “Face Detail”, and “Makeup”, including face definition, cheek blush, lip color, lip gross, eyeliner, shadow, etc. I got some human-like one as shown on the right. With eyebrows and eyelashes, it could be usable. But there are so many reedy-made skins available, this process may not be needed except for eccentric face.

By putting a dot on the “Inventory” button on the left of “Pick Texture” window, your inventory will open on the right side. If left-crick on any texture in the inventory, the texture will be transferred to the face. In this case a floor tile texture was used as-is. To return to the edited skin, push the “Transparent” button.

The left is a marble texture for a statue effect. The other two are monotone for shooting pictures. The clothing, hair and eyeballs were painted with the same color.

The third way is to edit the skin texture directly. For example, I changed the skin and lip color. The skin can be made by editing with Photoshop, or to use real face pictures with suitable deformation. Tattoo might be made with this process. Classic clothing also can be made with this. I have enjoyed making more than 50 T-shirts for myself. This method is a bit complicated, so I wil introduce it next time.

This is my most favorite one. The bust is not prim but a kind of tattoo. The fins are commercial items. All pictures above were using a classic body with an identical shape, which normally should be fine-tuned for each skin.
Please visit old articles for Bento with classic skins.
Face:http://temisirbu.slmame.com/e1703241.html
Body:http://temisirbu.slmame.com/e1715560.html

1.To pick up a favorite one out of variations of available skins.
2.To edit the color to favorite one.
3.To edit the skin texture directly.
The below shows some of my skins which I got free. I have more than 300 skins in my inventory. Normally one skin comes with 10 to 20 variations, so it should be easy to find a favorite one without editing. The eyebrows are separate parts that can be changed.

The second way is to edit oneself. An editable skin is required. Most of skins are No Modify, so need to use free gifts or the one provided for newbies by Linden. Do not forget to make a copy and save it before editing, not to lose the original one. With the skin worn condition, touch “Edit” of the skin in your inventory to open the “Editing Skin” window (left). Since the skin is treated as Tattoo, the “Skin Color” table will not work with it. Then click the “Head Tattoo” on the left to open the “Pick Texture” window (right).

Click the “Transparent” in the opened window. The button turns dark but will return by pushing “Default”, “Blank”, or “None”. Some strange face may come out, but this should be edited in the left window.

The editing items are under “Skin Color”, “Face Detail”, and “Makeup”, including face definition, cheek blush, lip color, lip gross, eyeliner, shadow, etc. I got some human-like one as shown on the right. With eyebrows and eyelashes, it could be usable. But there are so many reedy-made skins available, this process may not be needed except for eccentric face.

By putting a dot on the “Inventory” button on the left of “Pick Texture” window, your inventory will open on the right side. If left-crick on any texture in the inventory, the texture will be transferred to the face. In this case a floor tile texture was used as-is. To return to the edited skin, push the “Transparent” button.

The left is a marble texture for a statue effect. The other two are monotone for shooting pictures. The clothing, hair and eyeballs were painted with the same color.

The third way is to edit the skin texture directly. For example, I changed the skin and lip color. The skin can be made by editing with Photoshop, or to use real face pictures with suitable deformation. Tattoo might be made with this process. Classic clothing also can be made with this. I have enjoyed making more than 50 T-shirts for myself. This method is a bit complicated, so I wil introduce it next time.

This is my most favorite one. The bust is not prim but a kind of tattoo. The fins are commercial items. All pictures above were using a classic body with an identical shape, which normally should be fine-tuned for each skin.
Please visit old articles for Bento with classic skins.
Face:http://temisirbu.slmame.com/e1703241.html
Body:http://temisirbu.slmame.com/e1715560.html


Pin2 Face
Halloween at Bar Sachiko
huge breasts
Sachiko's New Outfit
Pin2 Disappeared
Farewell, Mogu
Halloween at Bar Sachiko
huge breasts
Sachiko's New Outfit
Pin2 Disappeared
Farewell, Mogu
Posted by Temi Oyen at 18:05│Comments(0)
│Faces
書き込まれた内容は公開され、ブログの持ち主だけが削除できます。